

Pysanka
Join me as I learn to decorate Easter Eggs the Ukrainian way, travelling through crafts.

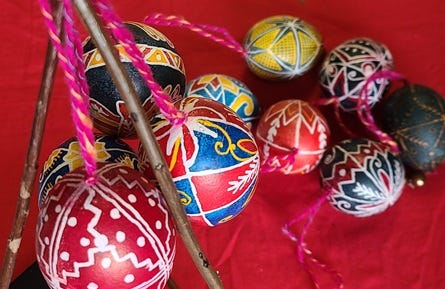
After thinking about how festivals can inspire crafts last month, I put this into practice this month by learning about Pysanka - a Ukrainian way of decorating eggs for Easter using wax and multiple dips into colours. This art is on the Representative List of the Intangible Cultural Heritage of Humanity, and is currently considered endangered. Variations of it can be found in other countries as well, mostly Eastern European, such as Poland or Hungary, and it would be fascinating to see how examples from each region differ. Maybe that’s a project for next year ;-)
Travel Craft Inspirations: Festival-Related Crafts

Let’s face it, sometimes you would like to go travelling, but you just can’t. Whether it be time, money, commitments, health or anything else, not everybody can fit in a trip whenever they like. But luckily, that doesn’t mean that you cannot experience the cultures of other lands, because crafting can be a great way to “armchair travel.”
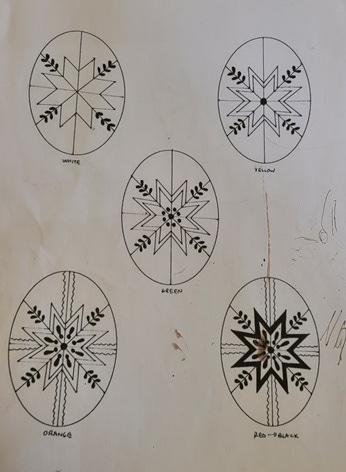
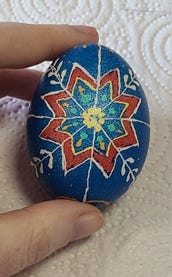
I did a workshop with heritage artist Valeria Leonova, who explained that while we today may very much associate decorated eggs with Easter, this tradition actually pre-dates the Christian festival, having its roots in older celebrations of spring and renewal. Eggs were decorated with patterns symbolising a rich harvest, like little dots for grain or a rake, health and longevity, like the sun, a rose or a fish, healing, like abstracted pine branches or bugs, and love, like the cuckoo or flowers. She also brought a lot of examples for inspiration, both finished eggs and a whole album of images, so we had a lot to consider.
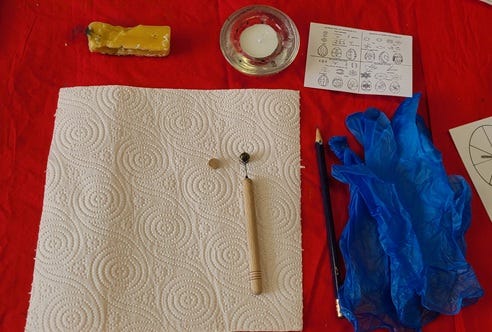
We worked with a kistka, a specialised stylus, that allows the drawing of quite fine lines of molten wax onto the egg, though it is also possible to use other tools, such as a pin or stick, I have also seen it done with a nib of a calligraphy pen. The great thing about the kistka is that it holds a small reservoir of wax, so there is less need to go back to the wax source for refills. The not-so-great thing about the kistka is that it takes a while to get used to it (as with any new writing/drawing tool), and for the newbie, wax splotches are not unusual. But surely that is part of the charm of the handmade!
The idea behind this type of decorating is that it is a resist method - you draw on lines with wax and then dye the egg (we used food colouring, but this can also be done with natural dyes, like boiled onion skins, turmeric or beetroot), with the wax line preserving the colour the egg was before the dye dip. You then add to your design with more wax lines, which then get preserved when dipping the egg into a new colour.
Yes, this takes a bit of concentration and careful planning in order to create the design with the colours you envision. Luckily, Valeria had brought some of the designs complete with a step-by-step template of what part of the design to add when, which I happily made use of.
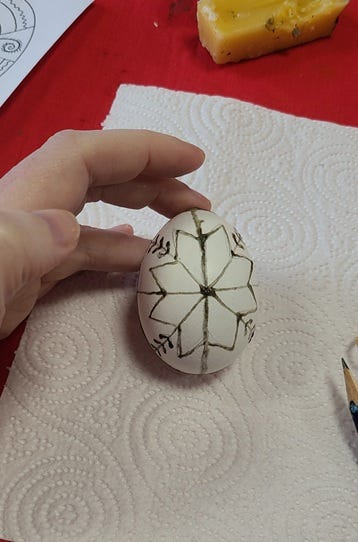
After sketching out the initial design in pencil (a small rubber band really helped with drawing lines at the circumferences), it was time to heat up the kistka over a tealight and once it was hot enough to scoop some beeswax from a block to fill in the reservoir. Then, carefully making sure there were as few blotches as possible, I started drawing on my design in wax. (The pencil marks at this stage will disappear at the end when the wax gets taken off.)
Once this was done, we dipped it for a few minutes in the yellow colour. Then I drew on the lines that were supposed to remain yellow, and we dipped it in the green, etc. To be honest, I was not sure how dyeing in orange after green would work out, but stuck with it, because that is what my template said. I expected this to come out brown, but actually, the orange replaced the green, which might have been down to the vinegar that was also added to the dyes.


After the last dip, the wax is melted off. Valeria did this with a hairdryer-like tool while wearing gloves protecting her hands from the heat. It was only then that she, very carefully, blew out the eggs for us. (I was curious why she did it this way around, because I remember decorating eggs as a kid and we usually blew out the eggs before decorating them if we wanted to keep the eggs as decoration. She said that she prefers blowing them out after, because it is easier to handle the eggs when they are a bit heavier and they are easier to dye, because they don’t want to constantly float to the surface, which they do when they are empty. While there is a risk that the eggs will break when they are blown out, she says that it hardly ever happens to her - and if it did, she would offer one of her eggs as a replacement. - I almost wish she had broken mine, because her eggs were so beautiful!)
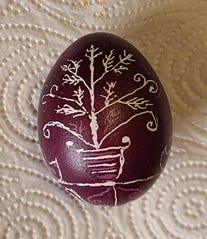
To finish off, Valeria threaded a loop to hang up the eggs, anchored by a bead at the bottom.

Have you ever decorated eggs with the wax-resist method? Tell me in the comments!
Your eggs turned out beautifully! The process reminds me of the kits we had as young children. The kits had a set of dyes in tablet form, a metal wire gadget for dipping the eggs in and out of the dyes, and a stubby little wax stick for drawing designs onto the eggs prior to the eggs being dyed. The whole thing was pretty cheap and the results pretty crude, but it was fun. I'd like to try it again with better tools and marginally better motor skills!